Stable Diffusion: The Expert Guide
As the artificial intelligence space continues to revolutionize creativity, Stable diffusion has become one of the most powerful and widely used text-to-image generation models. From creating artwork to designing game assets, this open-source model has unlocked new ways for individuals and businesses to generate high-quality visuals using simple text prompts.
In this expert guide, we’ll dive deep into stable diffusion, explaining how it works, why it matters, how to use it, and how it compares with models like DALL·E. Whether you’re a developer, digital artist, or business strategist, this in-depth article will equip you with everything you need to master Stable Diffusion.
What is Stable Diffusion?
Stable diffusion is an open-source text-to-image generative AI model developed by Stability AI, in collaboration with EleutherAI and LAION. It uses deep learning techniques to generate highly detailed images based on textual descriptions (also known as prompts).
Unlike traditional image generation models, Stable diffusion works by “diffusing” noise out of a random image, gradually shaping it into something that matches the user’s prompt. Released in August 2022, Stable diffusion quickly gained popularity because it is powerful, accessible, and open-source.
Key features include:
-
Text-to-image generation
-
Image-to-image transformation
-
Inpainting and outpainting
-
Fast inference with consumer-grade GPUs
Why is Stable Diffusion Important?
Stable Diffusion matters for several compelling reasons:
1. Open Access and Customization
Unlike proprietary models like OpenAI’s DALL·E, Stable Diffusion is fully open-source. Anyone can download, modify, and fine-tune it for specific applications, making it ideal for researchers and startups alike.
2. Low-Cost Deployment
It runs efficiently on modern consumer GPUs (like an NVIDIA RTX 3060), making high-quality image generation affordable and scalable.
3. Creative Freedom
With a wide range of capabilities—from artistic style rendering to realistic image generation—Stable Diffusion empowers users with full creative control.
4. Community and Ecosystem
Thanks to its open nature, a vibrant ecosystem has evolved around Stable Diffusion. Tools like AUTOMATIC1111, InvokeAI, and ComfyUI make it easier to use and expand upon.
How Does Stable Diffusion Work?
Stable Diffusion is a type of diffusion model, a class of machine learning models that generate images by starting with pure noise and gradually refining it into a coherent image. Here’s how it works step by step:
-
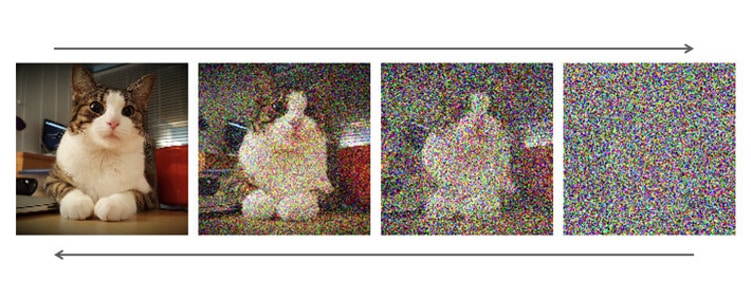
Starting with Noise: The generation process begins by adding Gaussian noise to an image, essentially scrambling it until the original content is unrecognizable.
-
Reversing the Noise Process: The model is trained to reverse this noise, step-by-step, until the image becomes clear again. This is known as the reverse diffusion process.
-
Noise Prediction: A neural network predicts the amount of noise to remove at each step. Over many iterations, this transforms a random noise pattern into a high-quality image that matches the input prompt.
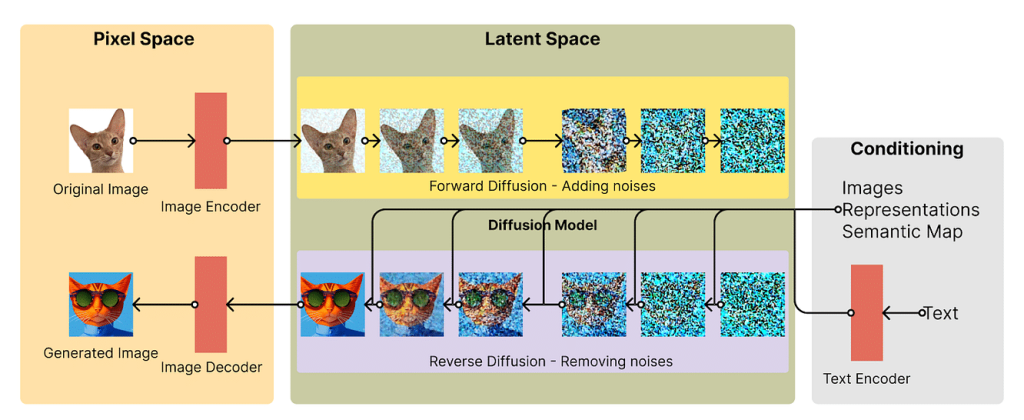
However, Stable diffusion is unique because it doesn’t work directly in the full-resolution image space like many older diffusion models. Instead, it uses a latent space—a lower-dimensional, compressed representation of the image.
Why Use Latent Space?
A standard 512×512 color image has over 786,000 pixel values (512 × 512 × 3 channels). Processing data at this scale is computationally expensive. Stable Diffusion solves this by working in a compressed latent space that’s about 48 times smaller, containing just 16,384 values.
This optimization dramatically reduces the memory and computing power required, making it possible to run Stable Diffusion on consumer-grade GPUs with just 8 GB of VRAM—something previously only possible with cloud GPUs or high-end systems.
The Role of VAEs (Variational Autoencoders)
To go from latent space back to a realistic image, Stable Diffusion uses a decoder powered by Variational Autoencoders (VAEs). The VAE helps reconstruct detailed features, such as facial features, eyes, or textures, during the final steps of image generation. This ensures the output is not just coherent but visually detailed and aesthetically pleasing.
Training Data
Stable Diffusion Version 1 was trained on three large-scale datasets collected by LAION, an open-source data organization. One key dataset is LAION-Aesthetics v2.6, which includes millions of images rated for visual appeal (aesthetic score ≥ 6). These curated datasets help the model generate high-quality, human-like images across a wide variety of prompts.
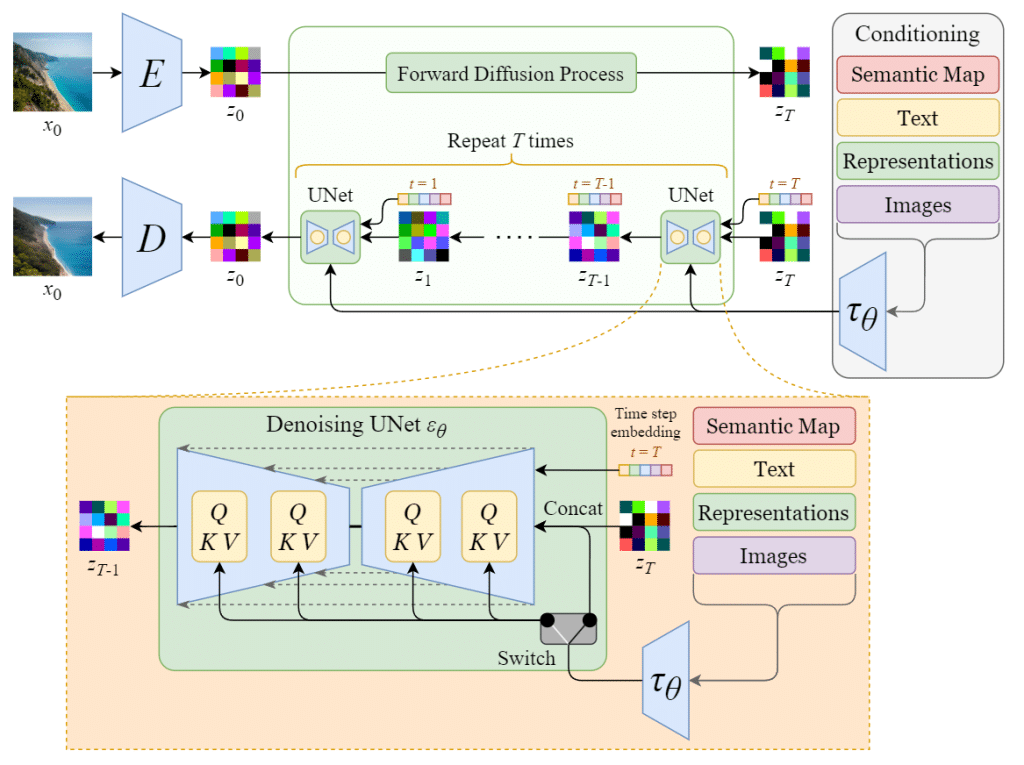
What Architecture Does Stable Diffusion Use?
Stable Diffusion is built on a powerful and efficient architecture that combines several key components to turn text prompts into detailed images. These components include:
- VAEs for compressing and reconstructing images
- Forward and reverse diffusion for noise handling
- A U-Net noise predictor for step-by-step image creation
- CLIP-based text conditioning to align images with prompts
Let’s break down what each part does and how they work together.
1. Variational Autoencoder (VAE)
The VAE is made up of two parts: an encoder and a decoder.
-
The encoder compresses a high-resolution image (usually 512×512 pixels) into a smaller, easier-to-process version in what’s called latent space—a more abstract, mathematical representation of the image.
-
The decoder takes the final, generated image from latent space and reconstructs it back into a detailed 512×512 image.
Using latent space allows Stable Diffusion to work much faster and use less memory, making it accessible even on mid-range computers with GPUs like an NVIDIA RTX 3060.
2. Forward Diffusion
This process gradually adds random noise (Gaussian noise) to an image over many steps until the image becomes completely unrecognizable—just static. This is done during the training phase, helping the model learn how images degrade.
Although forward diffusion is not used when generating images from text, it is used when you’re converting one image into another (image-to-image generation).
3. Reverse Diffusion
Reverse diffusion is where the actual magic happens during image generation. The model learns to undo the noise added during the forward process—step by step—eventually forming a clean, realistic image based on the prompt.
For example, if you only trained the model with pictures of cats and dogs, it would always generate something resembling a cat or a dog. But Stable Diffusion has been trained on billions of images with associated text descriptions, so it can generate a wide range of subjects and styles based on your prompt.
4. Noise Predictor (U-Net)
The noise predictor plays a central role in reverse diffusion. Stable Diffusion uses a type of deep learning model called U-Net—originally developed for medical image segmentation.
This U-Net is based on a ResNet (Residual Neural Network) backbone, a popular architecture in computer vision tasks. Its job is to:
-
Analyze the noisy latent image at each step
-
Predict the amount of noise present
-
Subtract the predicted noise
-
Repeat this process over multiple steps to gradually “clean” the image
This iterative denoising process is what converts static noise into a fully-formed image.
5. Text Conditioning (Prompt Embedding)
The final ingredient is text conditioning, which lets you guide image generation using natural language prompts.
Here’s how it works:
-
Your prompt (e.g., “A futuristic city skyline at sunset”) is processed using a CLIP text encoder, which turns the text into a 768-dimensional vector.
-
These vectors represent the meaning of your words in a format the model can understand.
-
Up to 75 tokens can be used per prompt.
-
The encoded prompt is then fed into the U-Net via a transformer model, allowing the denoising process to align with the meaning of your prompt.
You can also control randomness by setting a seed—a number that determines the starting point of the image generation process. Using the same prompt and same seed will always produce the same image.
What Can Stable Diffusion Do?
Stable Diffusion supports a variety of applications across different creative domains:
1. Text-to-Image Generation
Enter a prompt like “a futuristic city at night with flying cars,” and the model will render it into an image.
2. Image-to-Image Translation
You can feed in an existing image and use a prompt to modify it, such as turning a sketch into a painting.
3. Inpainting
Remove or edit parts of an image (such as replacing the background or fixing damaged parts) using context-aware inpainting.
4. Outpainting
Extend the canvas beyond the original boundaries to add more context or background to an image.
5. Style Transfer
Generate images in the style of specific artists or art movements, from Van Gogh to cyberpunk themes.
How To Run Stable Diffusion Online
If you’re just getting started and want to use Stable Diffusion without installing anything, running it online is the easiest way. There are a few user-friendly platforms that let you create AI images directly in your web browser.
Popular Online Platforms:
-
Hugging Face Spaces
-
DreamStudio (by Stability AI)
-
Replicate
-
Artbreeder
-
PlaygroundAI
Here is a breakdown of two of the most popular options:
1. DreamStudio by Stability AI
DreamStudio is the official web app created by Stability AI—the developers behind Stable Diffusion. It’s one of the fastest and most reliable ways to generate images using the latest version of the model.
Key Features:
-
Generate images in as little as 10–15 seconds
-
User-friendly interface for prompt input, size adjustments, and style settings
-
Access to the most up-to-date Stable Diffusion models
When you sign up for DreamStudio, you get 100 free credits, which is enough to generate around 500 images using default settings. If you want more, you can easily buy additional credits (e.g., $10 for 1000 credits).
DreamStudio is ideal for both beginners and professionals who want a smooth, high-quality image generation experience with lots of control.

DreamStudio user interface. Image source: DreamStudio.
2. Hugging Face
Hugging Face is a well-known open-source AI platform that also hosts demos for many machine learning models, including Stable Diffusion.
To try Stable Diffusion on Hugging Face, just go to the demo page (such as Stable Diffusion 2.1) and enter a text prompt. It’s free and doesn’t require advanced setup.
Pros:
-
100% free to use
-
No account needed to try basic demos
-
Access to multiple versions of Stable Diffusion and other AI models
Cons:
-
Slower image generation time compared to DreamStudio
-
Fewer customization options (e.g., you can’t change the resolution or style settings as easily)
Hugging Face is perfect for users who want to explore AI tools for free and are okay with a slightly slower experience.
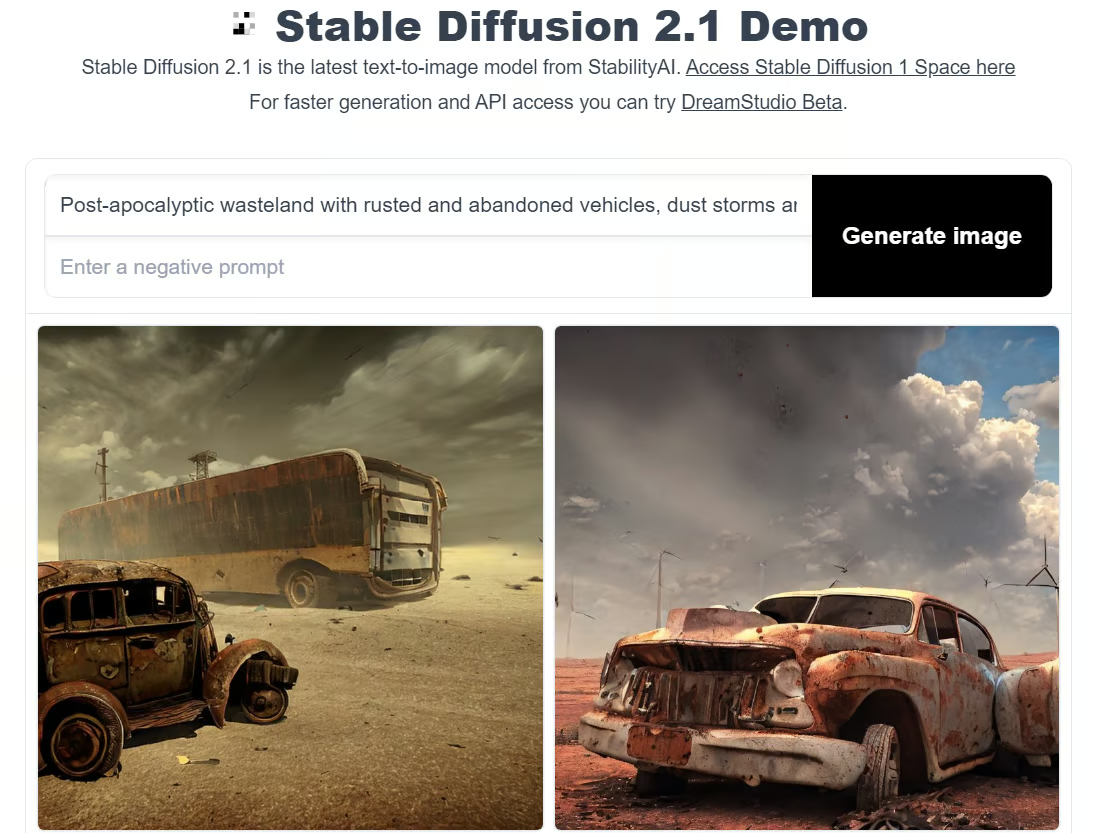
Stable Diffusion demo in Hugging Face. Image by author.
How to Run Stable Diffusion on Your Computer (Locally)
Want to try out Stable Diffusion right on your own PC? No problem—we’ll guide you through it.
Running Stable Diffusion locally lets you create images from your own text prompts and customize the results to better fit what you want. You can even fine-tune the model with your own data to get more personalized outputs.
Important: You need a GPU (a dedicated graphics card) to run Stable Diffusion smoothly on your computer.
Step 1: Install Python and Git
First, you need Python version 3.10.6. Download it from the official Python website. If you’re unsure how, check out “How to Install Python” guide.
To confirm Python is installed correctly, open your command prompt, type python, and press Enter. It should show the Python version you installed.
Note: Using Python 3.10.6 is strongly recommended. Using other versions may cause issues.
Next, install Git, a tool for managing code projects. If you need help, the Git Install Tutorial and Introduction to Git course are good resources.
Step 2: Create GitHub and Hugging Face Accounts
GitHub is a platform where developers share and collaborate on code. If you don’t have an account, now’s a good time to create one. You can follow our beginner-friendly GitHub and Git tutorial for help.
Hugging Face is a popular AI community that hosts many AI models, including Stable Diffusion. You’ll need an account there too, so you can download the latest Stable Diffusion model files. We’ll guide you through this part soon.
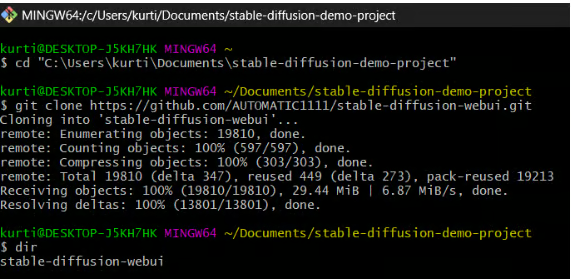
Step 3: Download (Clone) the Stable Diffusion Web-UI
In this step, you will download the Stable Diffusion Web-UI software to your computer. It’s a good idea (but not required) to create a dedicated folder for this project, like stable-diffusion-demo-project.
Here’s how to do it:
-
Open Git Bash
Make sure Git Bash is installed. It’s a program that lets you run Git commands. -
Go to your chosen folder
In Git Bash, use thecdcommand to navigate to the folder where you want to save Stable Diffusion. For example:cd path/to/your/folder -
Clone the Stable Diffusion Web-UI repository
Run this command to download the files:git clone https://github.com/AUTOMATIC1111/stable-diffusion-webui.git
-
Check the download
If everything worked, you will see a new folder named stable-diffusion-webui inside the folder you selected.
Note: For more detailed setup instructions tailored to your computer and hardware, check the official Stable Diffusion Web-UI GitHub repository.
Step 4: Download the Latest Stable Diffusion Model
-
Log in to Hugging Face
Go to the Hugging Face website and log in to your account. -
Download the Stable Diffusion model
Find the Stable Diffusion model you want to use and download the model file. Keep in mind these files can be large, so the download might take a few minutes. -
Locate the model folder on your computer
Open the folder where you cloned the Web-UI, then go to:stable-diffusion-webuimodelsStable-diffusion
-
Move the model file
- In the
Stable-diffusionfolder, you will see a text file namedPut Stable Diffusion Checkpoints here. - Move or copy the downloaded model file into this folder.
Step 5: Set Up the Stable Diffusion Web UI
-
Open Command Prompt (Windows) or Terminal (Mac/Linux)
-
Navigate to the Stable Diffusion Web-UI folder
Use the
cdcommand to go to the folder where you cloned the Web-UI. For example:cd path/to/stable-diffusion-webui
-
Run the setup script
In the folder, run this command to start the setup:webui-user.bat
This will create a virtual environment and install all the necessary dependencies to run Stable Diffusion. The process may take about 10 minutes—please be patient.
Note: For detailed setup instructions tailored to your system and hardware, refer to the official Stable Diffusion Web-UI GitHub repository.
Step 6: Run Stable Diffusion Locally
Once all dependencies are installed, your command prompt or terminal will display a URL like this: http://127.0.0.1:7860.
-
Copy the URL shown in the command prompt.
-
Paste it into your web browser’s address bar and hit Enter.
This will open the Stable Diffusion web interface on your local machine. From here, you can start entering text prompts and generate images right away!
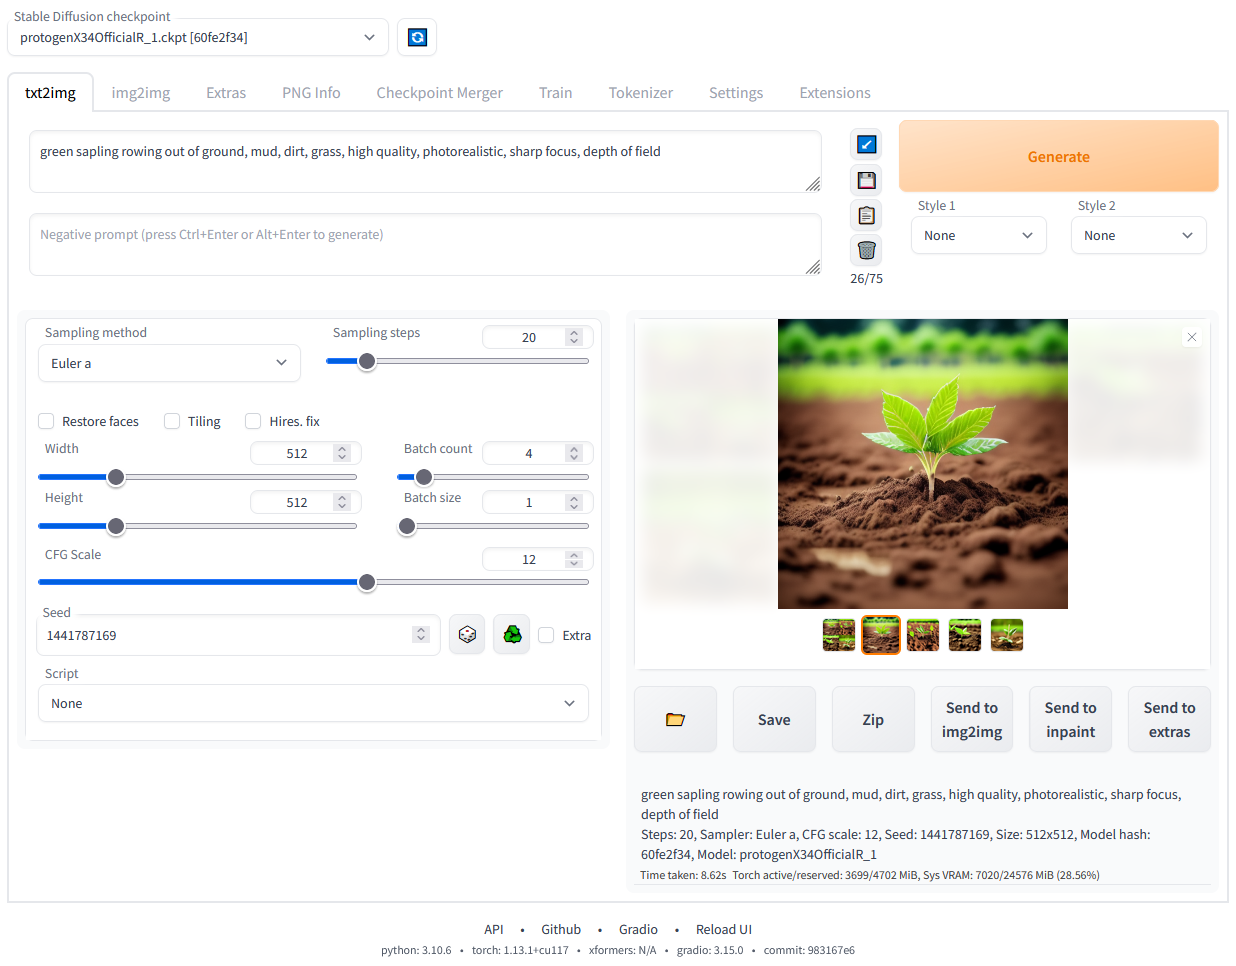
Stable Diffusion web UI running locally. Image by author.
Fine-Tuning Stable Diffusion
Fine-tuning, also known as transfer learning, is a method used in deep learning to improve a pre-trained model by teaching it new things from a smaller, more specific dataset. For example, you can take a powerful image-generation model like Stable Diffusion, which has been trained on a huge number of images, and further train it on a smaller set of images related to your particular needs.
In this guide, we’ll explain how fine-tuning works, why it’s useful, and common techniques used for fine-tuning Stable Diffusion.
What Is Fine-Tuning and Why Is It Useful?
Pre-trained models like Stable Diffusion are great at generating general images, but they might not perform well in niche areas — especially if those types of images weren’t well represented in the original training data. Also, all large models can carry built-in biases from the data they were trained on.
Fine-tuning helps solve this by retraining the model with new data that better matches your specific use case. This could be anything from art in a certain style to images of a unique product.
The process usually involves:
-
Collecting a targeted dataset – usually hundreds or thousands of images.
-
Cleaning and formatting the data – to match what Stable Diffusion expects.
-
Training the model – while keeping most of the original model intact.
How Does Fine-Tuning Work?
Fine-tuning involves adjusting only part of the model:
-
The early layers (which learn general features like edges, shapes, and textures) are usually frozen — meaning they are left unchanged.
-
The later layers (which learn more specific details) are retrained on your new dataset.
Another key setting is the learning rate, which controls how quickly the model adapts to the new data. Setting this too high or too low can cause problems.
Pros and Cons of Fine-Tuning
Advantages:
-
Better performance in specific areas: Ideal for improving results in niche domains.
-
Faster and cheaper: Fine-tuning is much quicker and more efficient than training a new model from scratch.
-
More accessible: Allows anyone to tailor models for unique use cases.
Drawbacks:
-
Risk of overfitting: If not done carefully, the model might forget what it previously learned and only perform well on the new data.
-
Inherited issues: If the original model had biases or flaws, those may still exist after fine-tuning.
Types of Fine-Tuning for Stable Diffusion
Fine-tuning Stable Diffusion has become increasingly popular, especially among creators and developers who want to customize the model for their specific needs. Today, there are several easy-to-use methods—some of which don’t even require coding.
Here are the most common fine-tuning techniques for Stable Diffusion:
1. DreamBooth
DreamBooth is a powerful technique that teaches Stable Diffusion new concepts using just 3 to 5 images. It’s perfect for personalization—such as training the model to generate images of a specific person, pet, or object.
-
Best for: Personalizing the model with a few photos of your subject.
-
Note: Originally developed for Stable Diffusion v1.4.
2. Textual Inversion
Textual Inversion lets you introduce new visual ideas to the model using only a few images. Instead of retraining the whole model, it creates a special “keyword” or token that represents the concept. You can then use that keyword in prompts to generate custom images.
-
Best for: Learning and reusing specific visual styles or concepts through prompts.
-
Note: Commonly used with Stable Diffusion v1.5.
3. Text-to-Image Fine-Tuning
This is the traditional way of fine-tuning a model. It involves collecting and formatting a dataset, then training part of the model to learn from it. While this method gives you the most control over the output, it requires more setup and is prone to problems like overfitting (where the model becomes too specialized and loses general knowledge).
-
-
Best for: Developers who want full control over training and are comfortable managing data.
-
Note: More complex and time-consuming than other methods.
-
Fine-tuning requires GPU resources and some technical knowledge but delivers powerful results when personalized outputs are needed.
Which is Better, Stable Diffusion or DALL·E?
Stable Diffusion
-
Open-source and customizable
-
Can run locally for free (with a good GPU)
-
Great for detailed, photorealistic images
-
More control but may need tweaking
DALL·E
-
Easy to use, polished results
-
Cloud-based, paid service
-
Excels at creative and imaginative images
-
Less customizable but user-friendly
| Feature | Stable Diffusion | DALL·E |
|---|---|---|
| Open Source | Yes | No |
| Customizability | High | Low |
| Image Quality | High | High |
| Ease of Use | Medium | High |
| Deployment Cost | Low (if local) | Pay-per-use |
| Community Support | Strong | Moderate |
Which is better? Stable Diffusion for flexibility and cost-effectiveness; DALL·E for simplicity and high-quality creative outputs.
Verdict: Choose Stable Diffusion if you want open-source flexibility, custom fine-tuning, and local control. Choose DALL·E if you prefer simplicity and are okay with limited customization.
What’s Next for Stable Diffusion?
As of 2025, Stable Diffusion continues to evolve with community-driven innovation and enterprise adoption.
Stable Diffusion has changed the world of image generation forever. From creating realistic landscapes and unique characters to designing social media posts, the possibilities are only limited by our imagination. But researchers are now exploring ways to use Stable Diffusion beyond images—for example, in natural language processing (NLP) and audio applications.
We’re already seeing Stable Diffusion’s impact in many industries. Artists and designers use it to craft amazing graphics, artwork, and logos. Marketing teams create eye-catching campaigns, and educators experiment with personalized learning tools powered by this technology. And the potential doesn’t stop there—it’s also being used for video creation and image editing.
Using Stable Diffusion has become easier thanks to platforms like Hugging Face and libraries like Diffusers. New no-code tools like ComfyUI are making it even more accessible, allowing more people to explore and experiment without technical skills.
However, with great power comes responsibility. We must carefully consider ethical issues like deepfakes, copyright concerns, and biases in training data. These challenges highlight the importance of using AI responsibly.
So, where will Stable Diffusion and generative AI take us next? The future of AI-generated content is full of exciting possibilities. It’s up to us to guide this technology in a way that sparks creativity, encourages innovation, and respects ethical boundaries.
FAQs
Q1. Can I Run Stable Diffusion Without a Good GPU?
Yes, but with limitations.
-
CPU-only inference is possible but extremely slow (minutes per image).
-
Google Colab offers a free or low-cost way to use GPUs in the cloud.
-
RunPod, Paperspace, or Kaggle Notebooks are other affordable cloud GPU alternatives.
For casual use, cloud platforms or low-VRAM configurations (using models like sd-turbo) are your best bet.
Q2. Can I run Stable Diffusion on a computer without a dedicated GPU?
Stable Diffusion needs a lot of computing power, usually from a dedicated graphics card (GPU). While you can run it on a regular CPU, it will be very slow and not practical. For smooth and fast results, use a GPU with at least 6GB of video memory (VRAM).
Q3. How can I fine-tune Stable Diffusion with my own dataset?
Fine-tuning means training the model further with your own images so it learns to generate results more suited to your needs. You usually need to prepare a set of images, set up the training environment (with Python and other tools), and run training scripts. Tools like Dreambooth or Textual Inversion make this easier, allowing fine-tuning with just a few images and minimal coding.
Q4. What are some common issues I might encounter when running Stable Diffusion locally, and how can I troubleshoot them?
Common problems include:
-
Insufficient GPU memory: Try reducing the image size or batch size.
-
Installation errors: Double-check Python and Git versions, and follow setup instructions carefully.
-
Model not loading: Make sure you’ve downloaded and placed the model files correctly.
-
Slow performance: Close other heavy programs or try updating your GPU drivers.
If problems persist, checking community forums or GitHub issues for your specific error helps a lot.
Q5. How can I optimize the performance of Stable Diffusion on my GPU?
To get the best speed:
-
Use a GPU with enough VRAM (6GB or more).
-
Lower the image resolution or use simpler model settings.
-
Close unnecessary applications to free up GPU resources.
-
Use optimized versions of Stable Diffusion or run it on platforms with GPU acceleration.
Q6. Can I use Stable Diffusion to generate animations or videos?
Stable Diffusion is mainly designed for generating images, but some creative workflows use it frame-by-frame to create animations or video sequences. This process often requires additional tools to stitch images together smoothly and maintain consistency between frames.
Conclusion
Stable Diffusion is more than just a text-to-image generator—it’s a flexible, scalable, and democratized creative engine. Whether you’re generating art, training on custom data, or building applications, it gives you unparalleled access to visual AI innovation.
Its open-source nature and strong community support make it ideal for creators, developers, and businesses looking to harness the future of generative AI.
If you’re looking to explore AI image generation beyond surface-level tools, Stable Diffusion is where you should start.